Social Media
How To Permanently Delete Your Instagram Account
Sometimes, all you need is a social media detox. In this guide, we’ll show you how to permanently delete your Instagram account.

Instagram is one of the most influential social media platforms of this generation, but some would argue that its influence has been mostly negative. If you’re tired of Instagram users posting edited pictures of themselves and pretending to live a lifestyle they don’t actually live, then it might be the right time for you to permanently delete your Instagram account.
However, Facebook, the owner of Instagram, doesn’t want users to leave the platform and take their data with them. That’s why they made it unnecessarily difficult for anyone to delete their Instagram account. But don’t worry, we know exactly what you need to do to delete your Instagram account for good. Let’s get started!
Download Your Instagram Data (Optional)
Before you permanently delete your Instagram account, you might want to download a copy of your data in a machine-readable (JSON) format. That way, you can read your old posts and comments offline on your computer, which may come in handy if you ever decide to create another Instagram account. Here’s how to download your Instagram data.
- Log in to Instagram on a computer.
- Click your profile picture in the top-right corner and select “Settings”.
- Go to “Privacy and Security”.
- Click the “Request Download” link.
- Confirm your email address and click “Next”.
- Enter your Instagram password and click “Request Download” one last time.
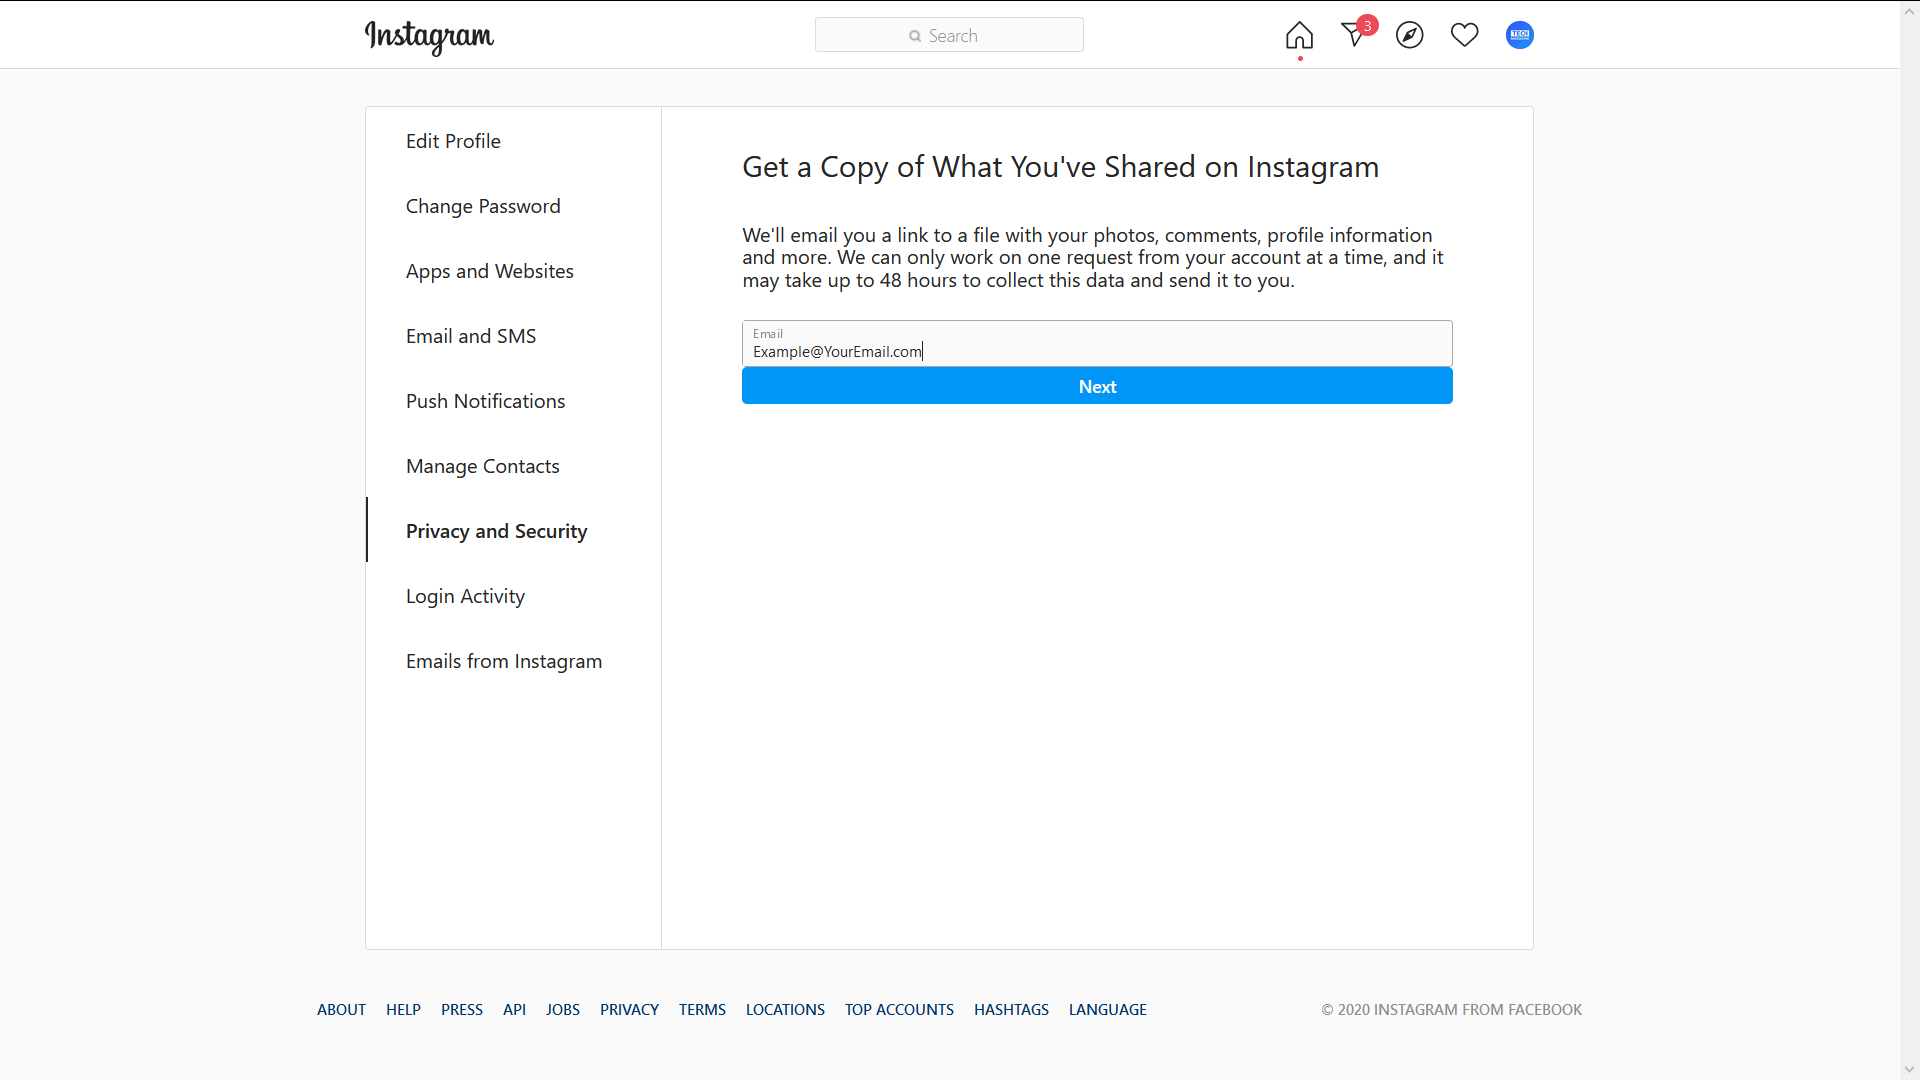
Instagram will then take up to 48 hours to collect your photos, comments, profile information, and more before emailing everything to you.
Follow These Steps To Permanently Delete Your Instagram Account
Before we start, you need to know that it’s impossible to delete your account directly from within the Instagram app. Yes, you can technically use the app’s built-in web browser to initiate the account deletion process, but, at that point, you might as well just use a regular web browser like Chrome or Firefox.
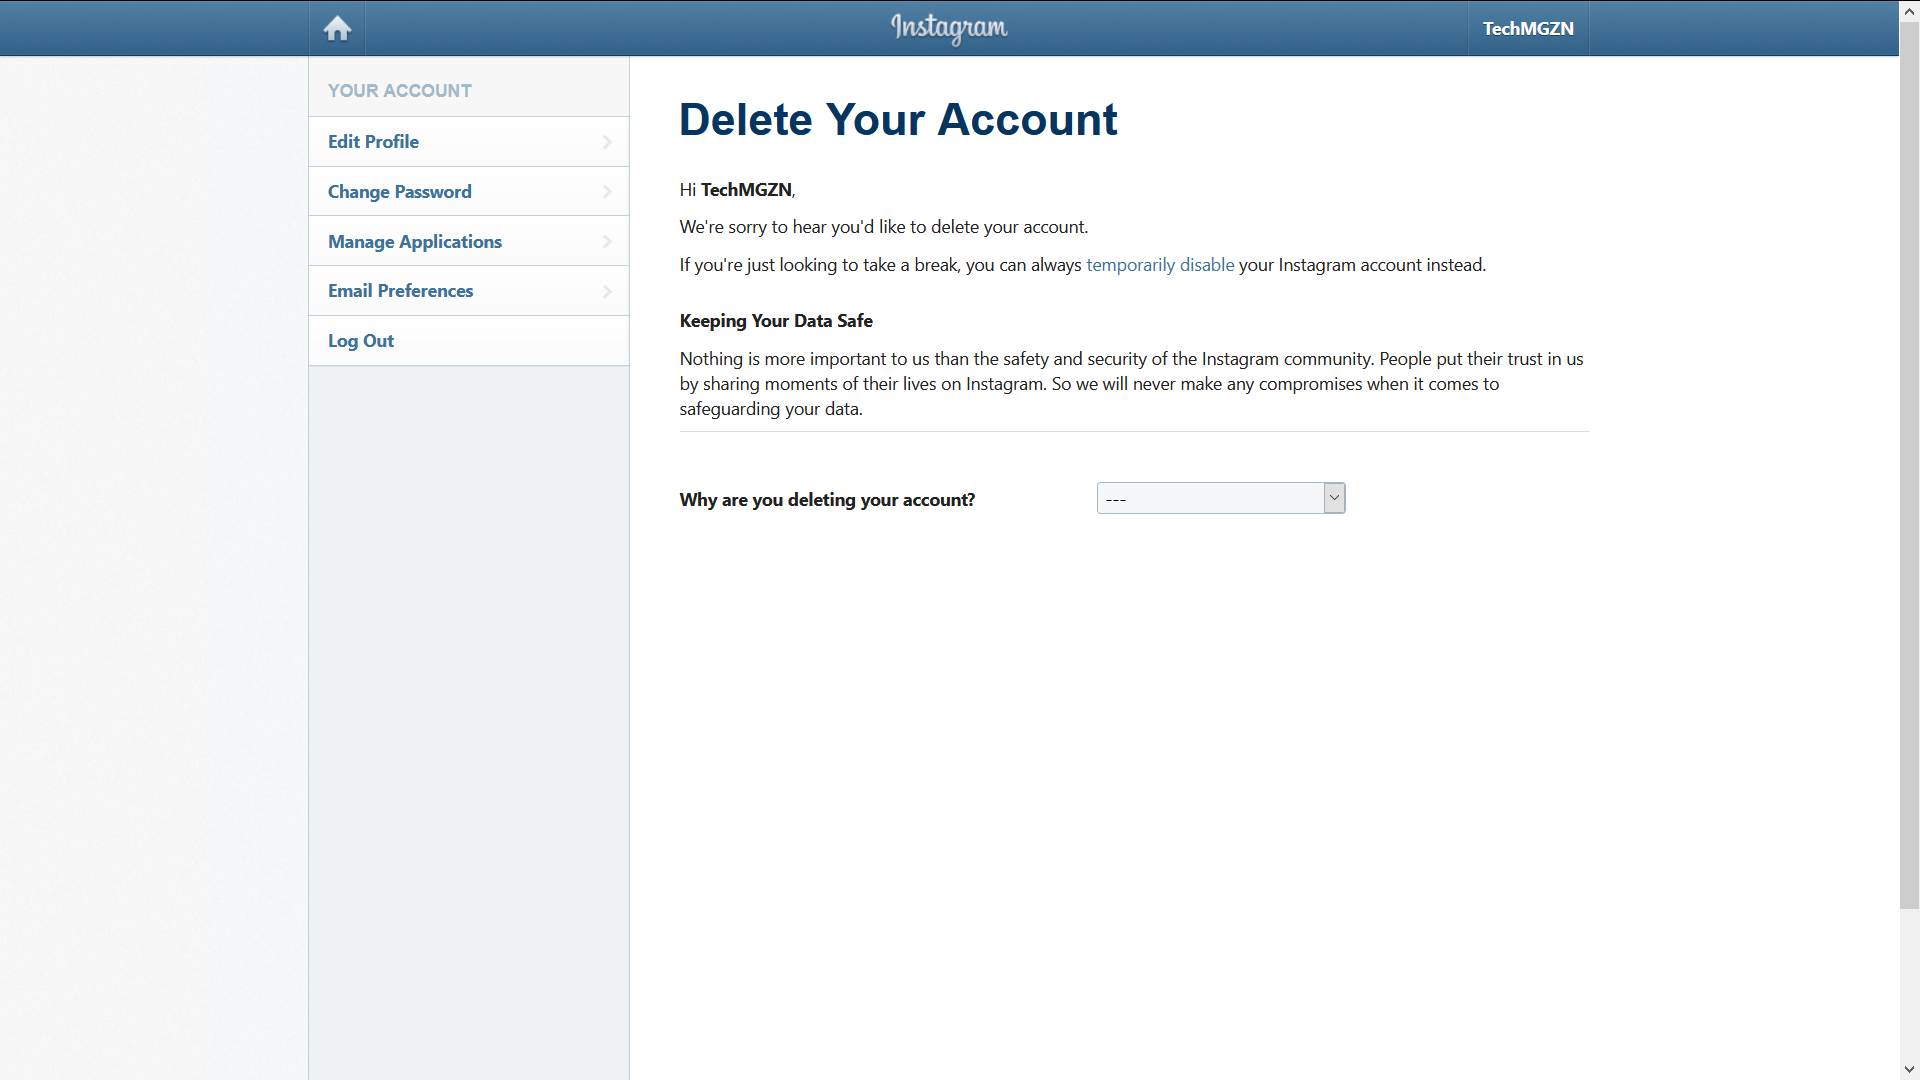
Step 1: Go To The Delete Your Account Page
First, you need to open a web browser on your computer or mobile device and go to the Delete Your Account page. If you’re not currently logged in to your Instagram account, you will be asked to do so before you can access the “Delete Your Account” page.
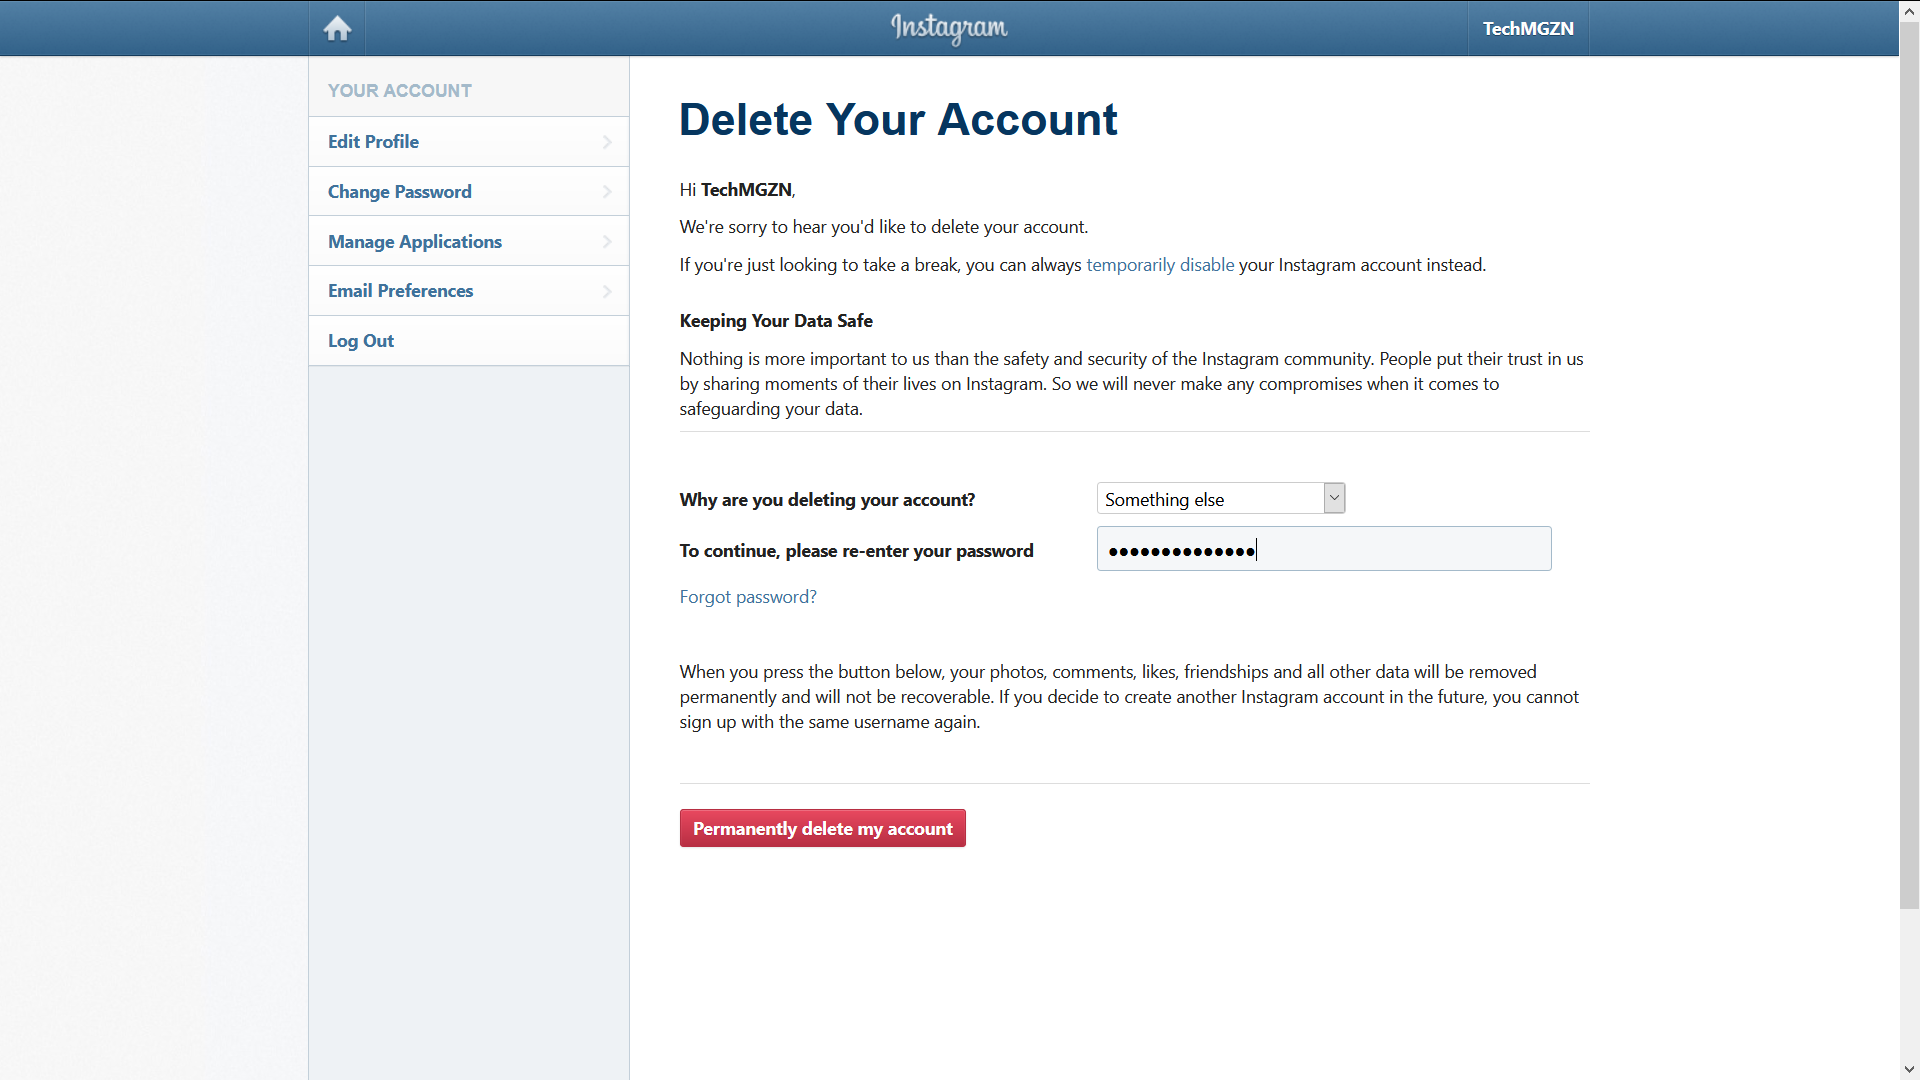
Step 2: Confirm The Decision To Delete Your Instagram Account
Here’s when Instagram throws in a couple of extra steps just to make the account deletion process a bit more cumbersome. To proceed, you need to specify why you want to delete your account by picking the most suitable answer from a drop-down menu. It doesn’t really matter which answer you pick, so feel free to select anything you want.
Next, you need to re-enter your Instagram password. If you don’t remember it anymore because you’ve been logged in to Instagram for a long time, you can click the “Forget password?” button to reset it. Then, click the “Permanently delete my account” button. Finally, confirm your decision to delete your Instagram account one last time by clicking the “OK” button.
Step 3: Wait Until Your Instagram Account Is Permanently Deleted
Unfortunately, Instagram doesn’t honor account deletion requests right away. Instead, the social media platform will wait 30 days before deleting your account, and there’s nothing you can do about it. What’s more, it may take up to 90 days for Instagram to delete all the things you’ve posted.
Read Now: How To Find & Cancel Pending Instagram Requests
Permanently deleting your Instagram account should be a fairly easy thing to do, but if you do run into any issues, let us know in the comments below!


Social Media
How To Find & Cancel Pending Instagram Requests
This step-by-step guide will show you how to find and cancel all those pending Instagram requests that people have ignored.

Accidentally sending a follow request to the wrong person on Instagram can be a potentially embarrassing mistake. As these mistakes rack up over time, you could eventually find yourself with dozens of unapproved follow requests. The good news is that Instagram allows you to cancel pending follow requests as long as you meet one obvious condition: The person you’ve sent the request to has not accepted or declined it yet.
How To Find Pending Instagram Requests
Unfortunately, the Instagram app (or the website) doesn’t offer a direct way to view pending follow requests. That said, users have two alternative options: a quick but potentially unreliable method, and a more comprehensive but time-consuming approach.
The quick method involves checking your search history for recently requested profiles:
- Tap the magnifying glass icon at the bottom of the Instagram app.
- Tap the search bar at the top.
- Tap See all to view your search history.
- Look for profiles with a Requested button.
This method is fast but limited. It only shows recent searches and won’t work if you’ve cleared your search history. The good news is that there’s also a clever workaround that lets you dig up all your pending follow requests by downloading your Instagram data. Here’s what you need to do:
Step 1: Access Your Instagram Account Center
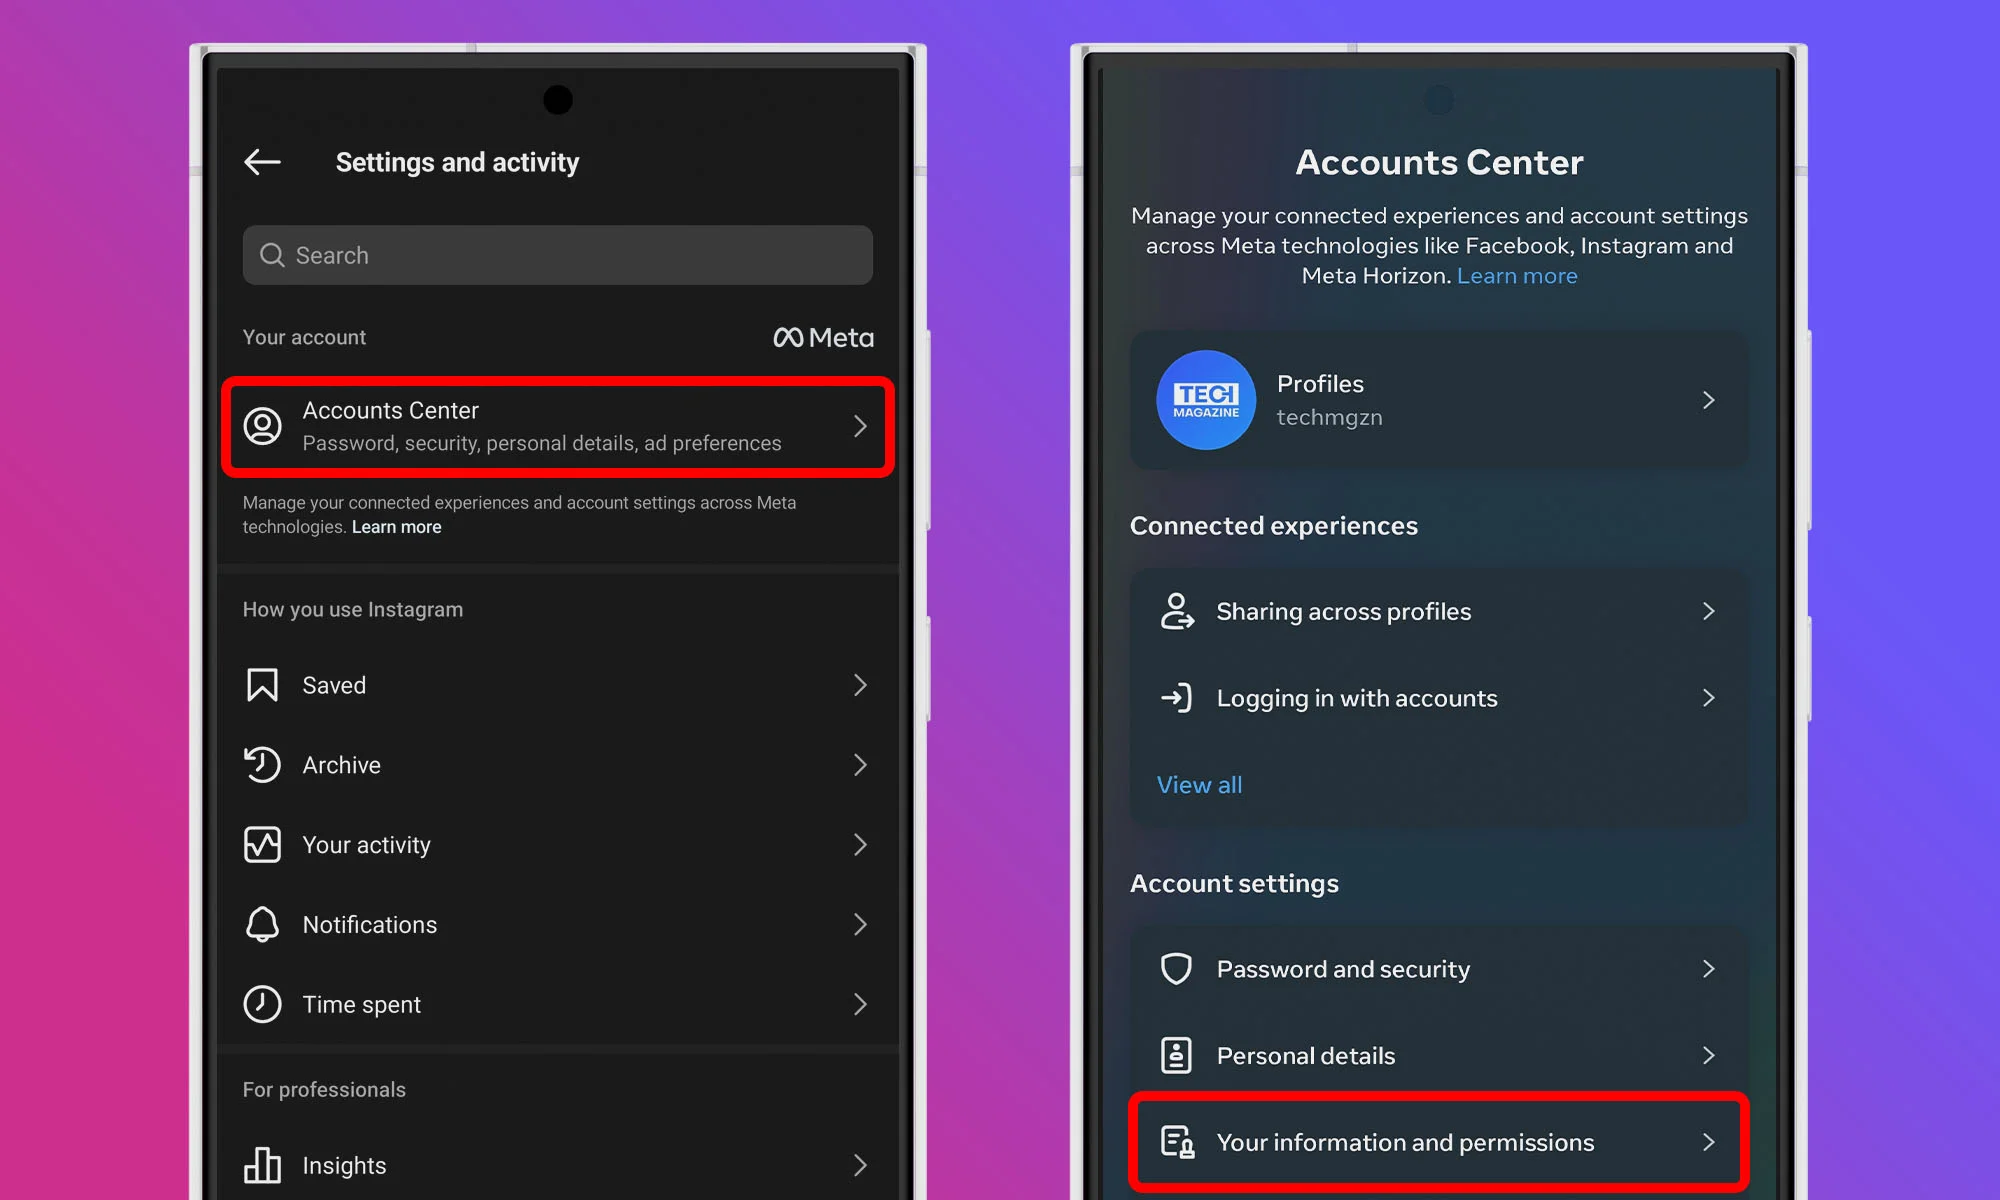
Start by opening the Instagram app on your mobile device and navigating to your profile by tapping your profile picture icon at the bottom right corner. Once you’re on your profile page, tap the three horizontal lines at the top right to open the menu. From there, select Account Center at the top of the list. Within the Account Center menu, navigate to the Your information and permissions section. There, select Download your information.
Step 2: Request A Download Of Your Information
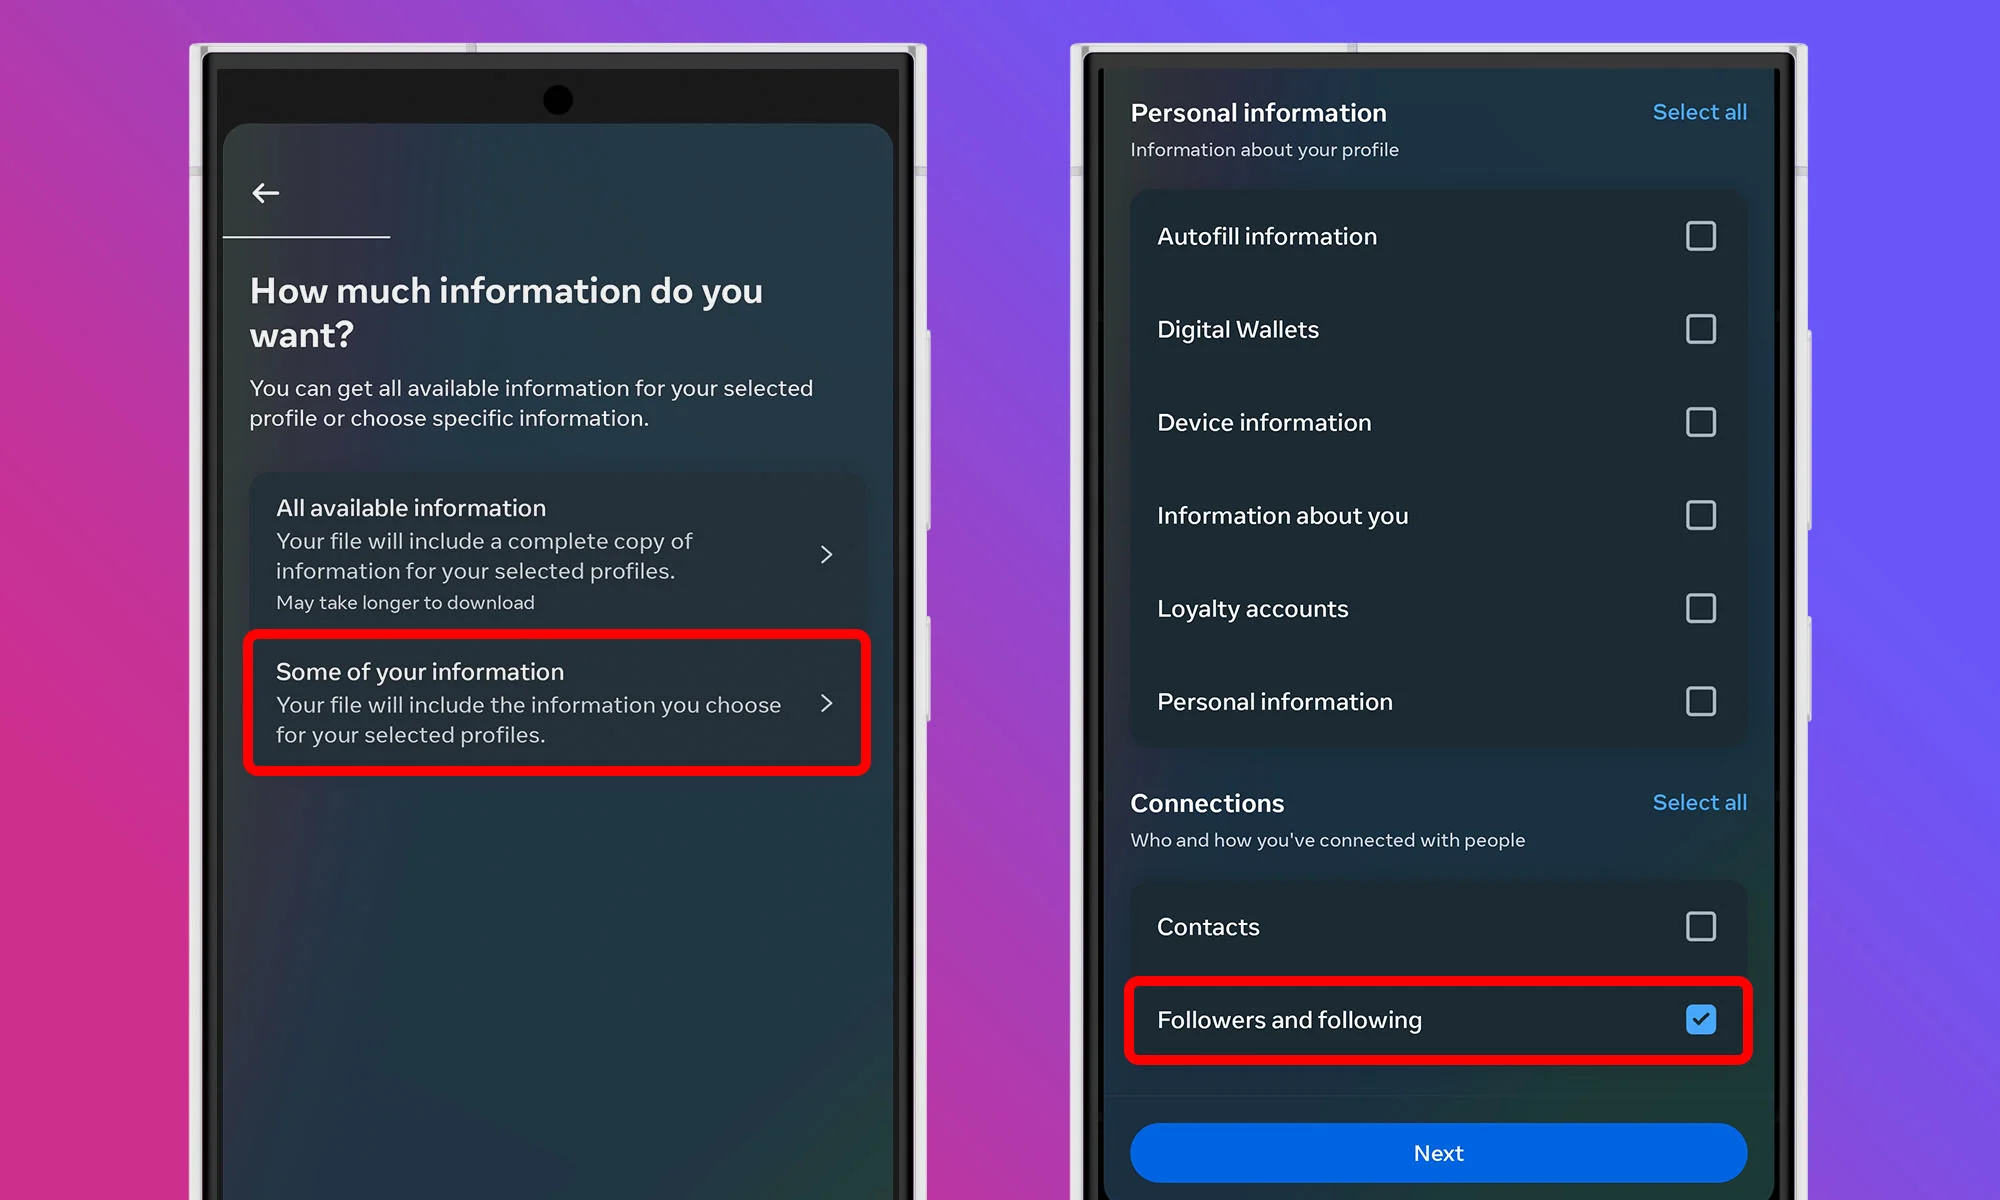
The Download your information feature allows you to request a copy of all the data Instagram has collected about your account. Don’t worry — this is a standard feature designed to give users control over their own data. Tap the Download or transfer information button. When asked how much information you want to download, select the Some of your information option. In the list that appears, find the Connections section and check the box next to Followers and following. This way, you’ll receive only relevant data.
Step 3: Set A Date Range And Submit Your Request
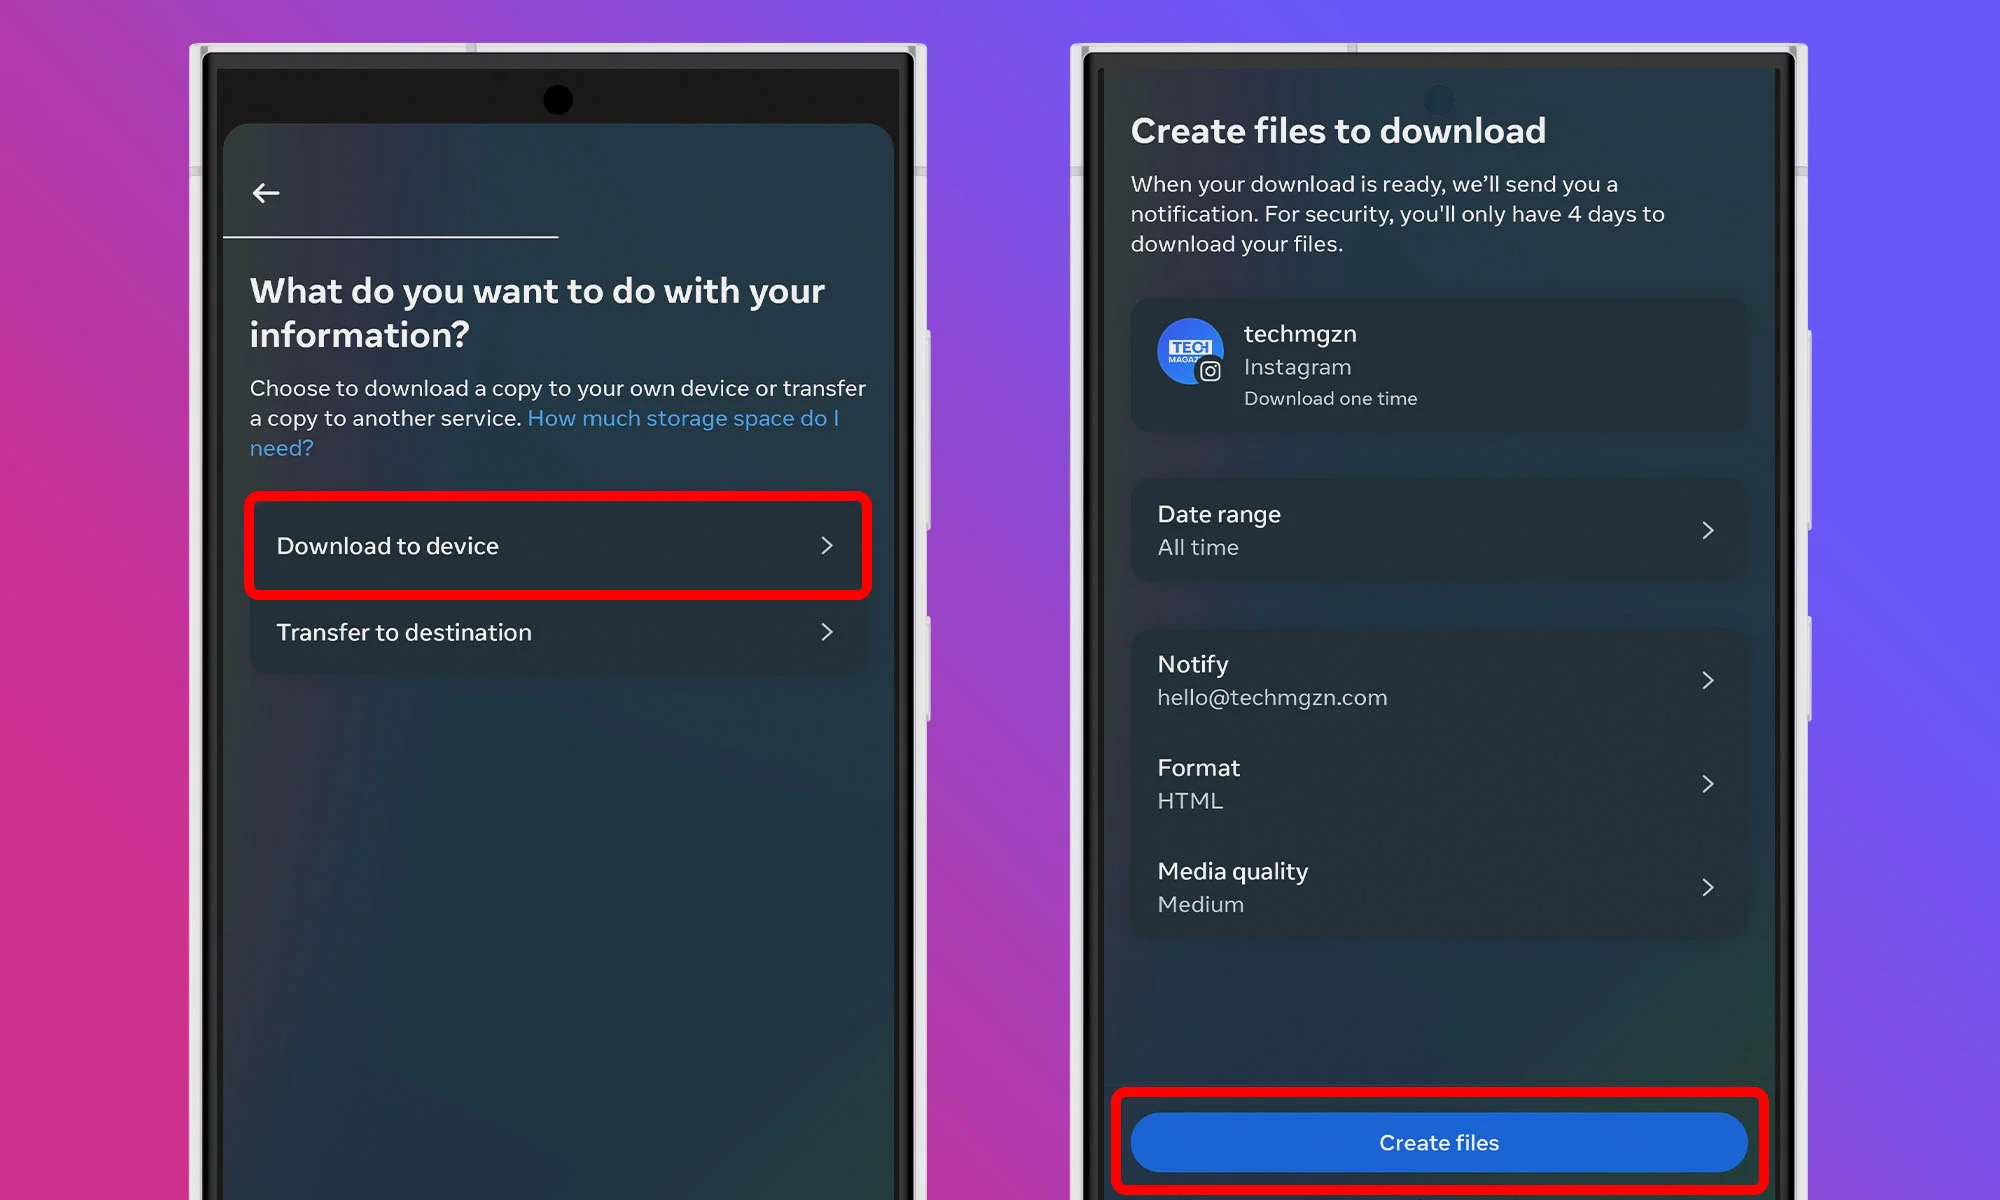
After selecting the data type, tap Next and choose to download the data to your device. You’ll have the option to set a Date range. If you want to see all pending requests since you joined Instagram, choose All time. Otherwise, select a specific time frame that suits your needs. Once you’ve made your selection, tap on Create files. Instagram will begin compiling your data.
Step 4: Wait For The Download Link
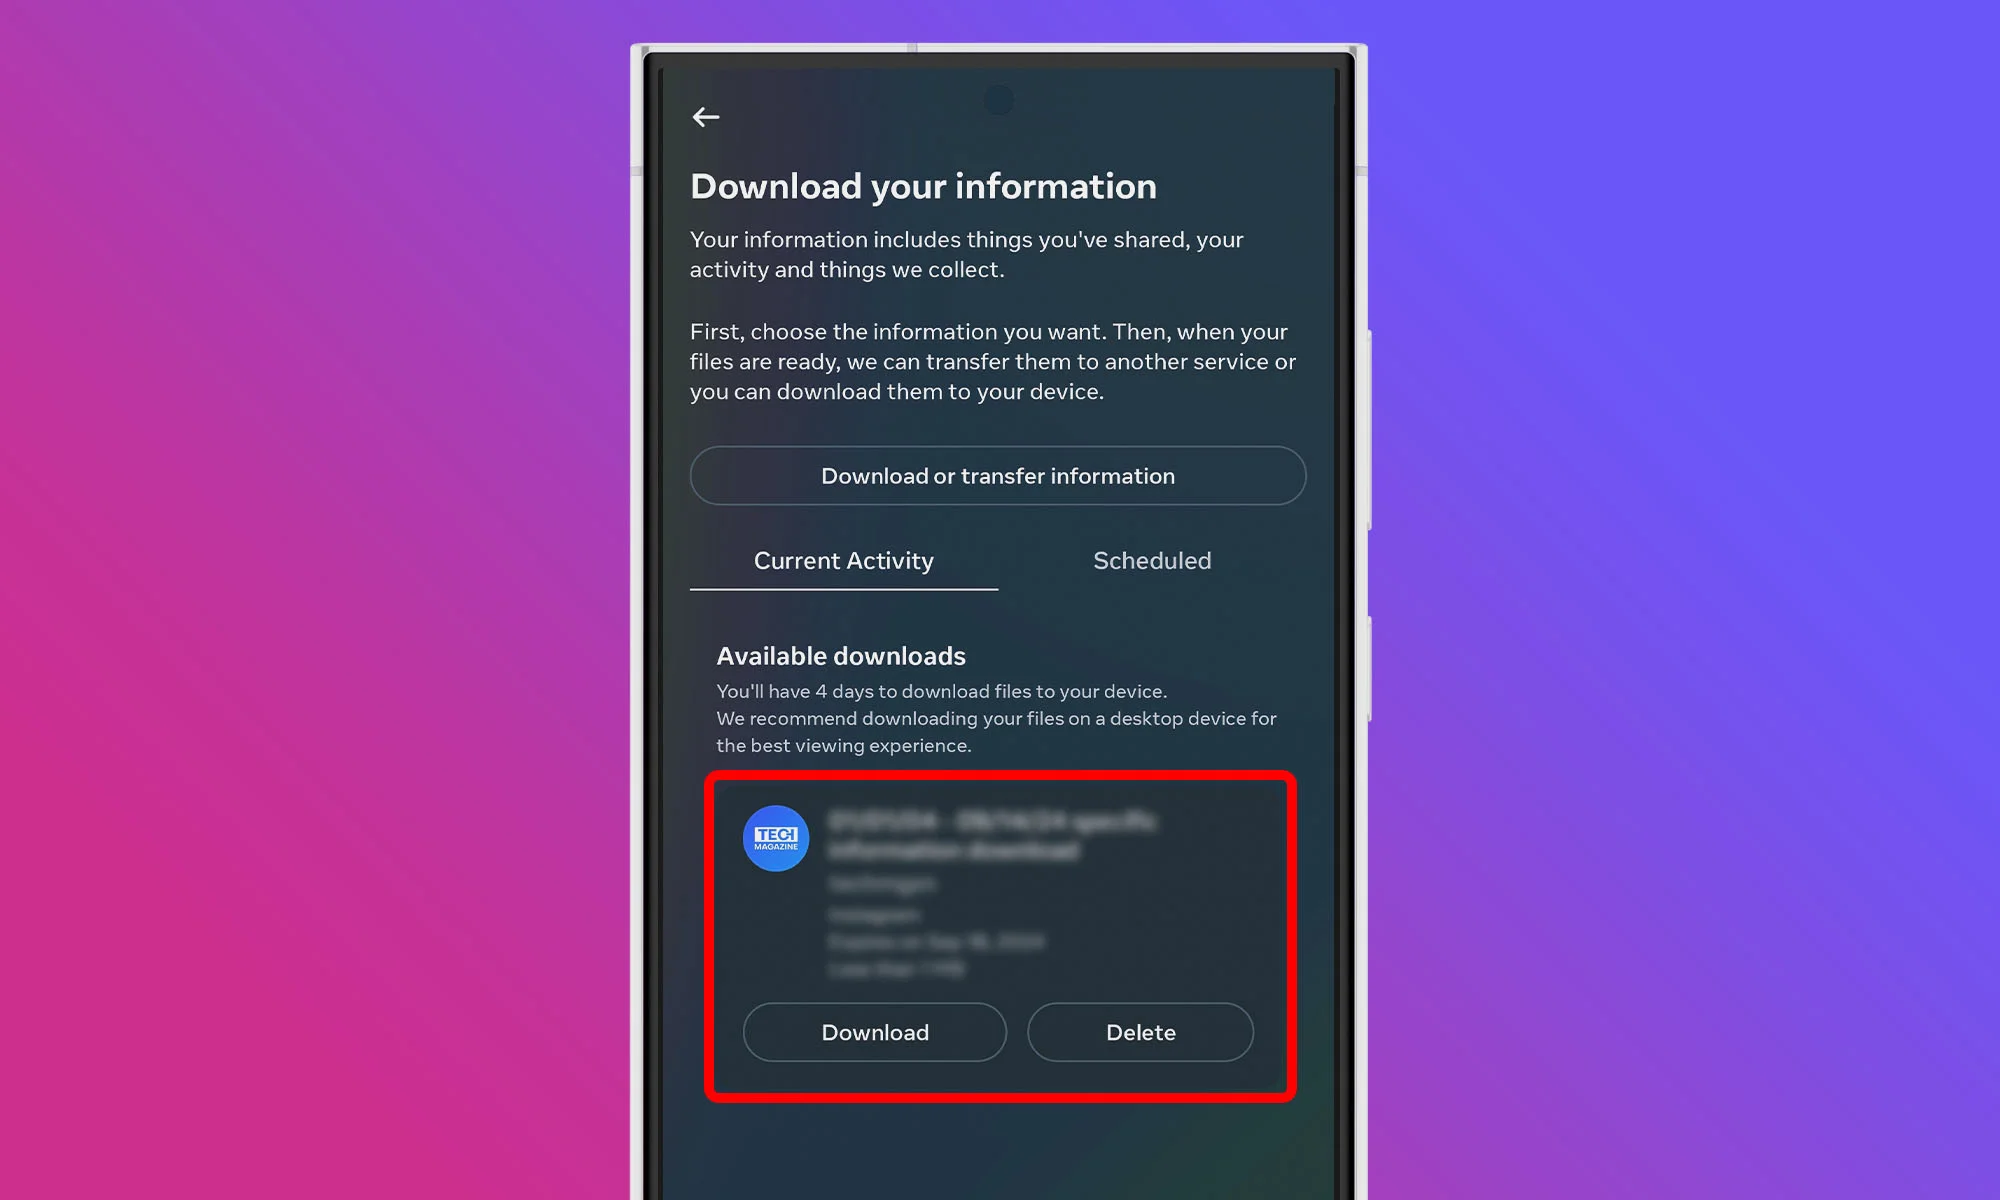
Instagram will process your request and send a download link to your registered email address. This might take anywhere from a few minutes to up to 48 hours, depending on the amount of data. Keep an eye on your inbox for an email titled “Your Instagram information“. Once it arrives, click on the Download information link provided in the email. You can do this on your mobile device.
Step 5: Extract Your Instagram Data
Your Instagram data will be downloaded as a ZIP file, and you need to use a file manager or extraction tool to extract its contents. You can now open the extracted folder using a File Manager (the Files app on iOS works nicely), look for a file named “start_here.html” and open it in your web browser. Find and click on Pending follow requests, and voilà! You’re now looking at a comprehensive list of all the follow requests you’ve sent that are still in limbo.
How To Cancel Sent Instagram Requests
Now that you’ve unearthed your pending follow requests, it’s time to clean house. Unfortunately, Instagram doesn’t offer a one-click solution to cancel all your pending requests at once, so expect the process to take a while, especially if you’ve sent a lot of follow requests.
Step 1: Locate User Profiles
For each pending request you want to cancel in the Pending follow requests section of the “start_here.html”, you’ll need to locate the user’s profile on Instagram. The quickest way to do this is by copying the username from your downloaded list and pasting it into the Instagram search bar. Once you’ve found the account, tap to enter their profile.
Step 2: Cancel The Follow Request
Look for the Requested button on their profile. This button is your target. When you tap it, it should immediately transform back into a blue Follow button. This visual change confirms that you’ve successfully cancelled your follow request.
Step 3: Repeat The Process
Now, rinse and repeat this process for each pending request you want to cancel. As you go through this process, you might find some accounts you still want to follow. In that case, simply leave the Requested button as is. Who knows? They might accept your request someday.
Also Read: How To Permanently Delete Your Instagram Account
As you can see, finding and cancelling Instagram follow requests isn’t complicated – you just need to know where to look. If you found this guide useful, let us know in the comments below. Also, make sure to follow us on Instagram!

2026 Crypto Trends: Bitcoin, ETFs & The Future Of Payments

At I/O 2026, Sundar Pichai Concedes AI Must Deliver Real Value

DJI Teases Dual-Camera Osmo Pocket 4P For 2026 Launch

Lebanon Ministers Meet Visa Over National Digital Payment Platform

AltoVolo Releases Sigma Footage & Sets Date For Demonstrator
AltoVolo Releases Sigma Footage & Sets Date For Demonstrator

NVIDIA Puts GPT-5.5 Codex In Hands Of 10,000 Staff

United Arab Emirates To Quit OPEC After 59 Years

YouTube Tests Conversational AI Search Tool